Tuesday, March 24, 17:24:21 2015
Product Modelling
The 'Product Modelling' feature of EziAccounts online bookkeeping is what really sets it apart from its competitors. Being able to create a model of your manufactured product with full costing enables you to take full control of your bottom line. Profit!
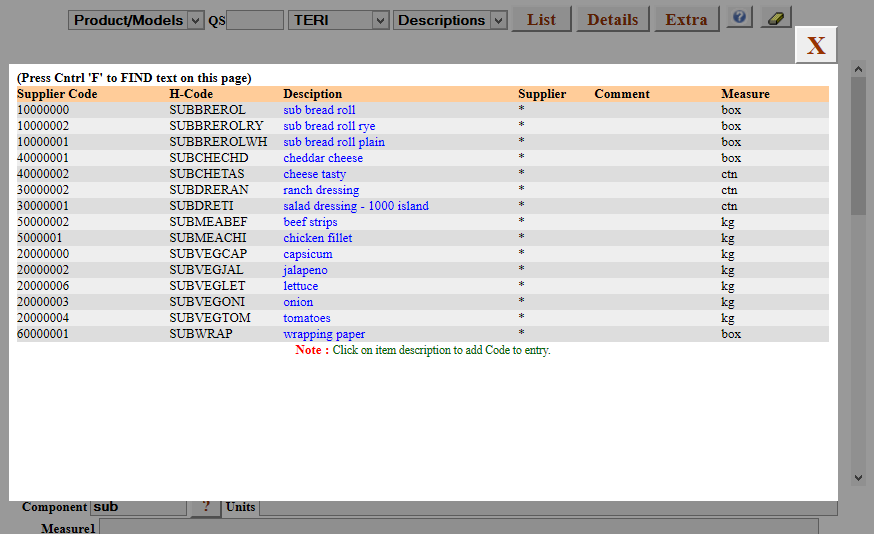
Before you can fully utilise this feature, you must enter the components that will be used to create your products. Open the 'Components' window to begin entering your items that will be used in the manufacturing process. Every nail, screw, timber, panel-board, glass, paint, fibreglass, ... whatever it is!
If you are operating a restaurant and want to track every potato, lettuce, sauce ingredient, cut of meat, etc., enter it here!
Open the 'Components' window and click on 'New' wizard button on the top of the screen to enter a new component. Pay particular attention on page 2 for how the products are sold and ordered.If you sell an item by the piece but buy it by the box, make sure you enter the correct conversion quantity. See blog on 'New Products' under the 'Inventory' topic for more information.
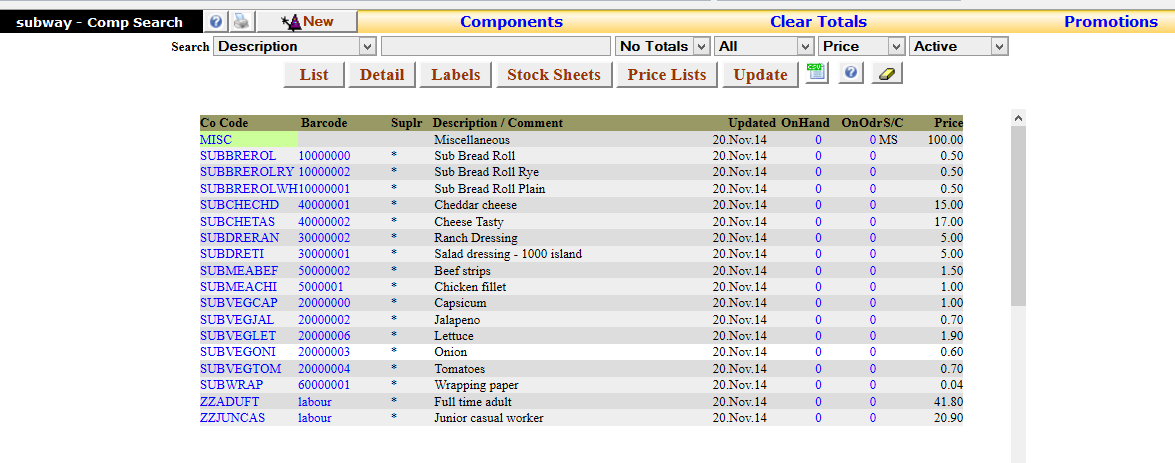
Each of these components will be used to make up our model sandwich.
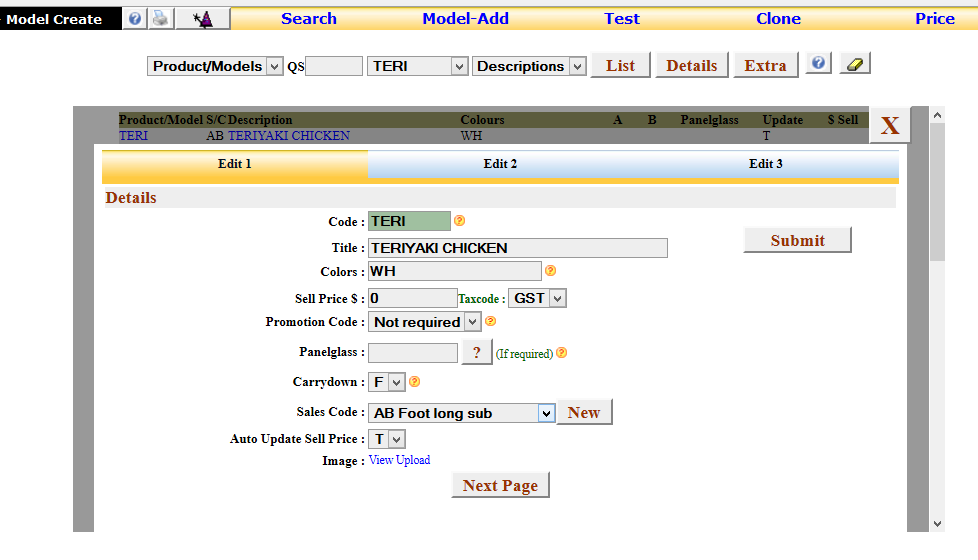
Open the 'Product / Models' window from the main screen.
Click on the 'Wizard' button at the top of the screen and enter the details of the model you want to create. For the base model only enter a 4 alpha code on which you will build your product.
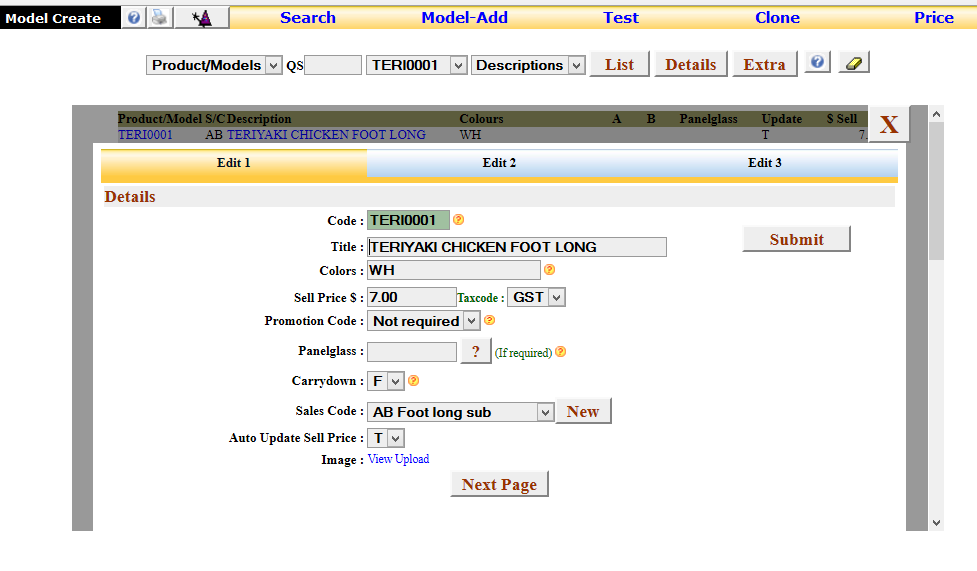
Click on the 'Wizard' button again to create your product. Use the alpha code you previously used as your base and add a numeric code. When manufacturing windows or cupboards the numeric code is broken into two parts. The first two characters are for length and the second two for height. For example, 0507 signifies 500mm x 700mm.
There is more information on this feature in the blog on using advanced modelling.
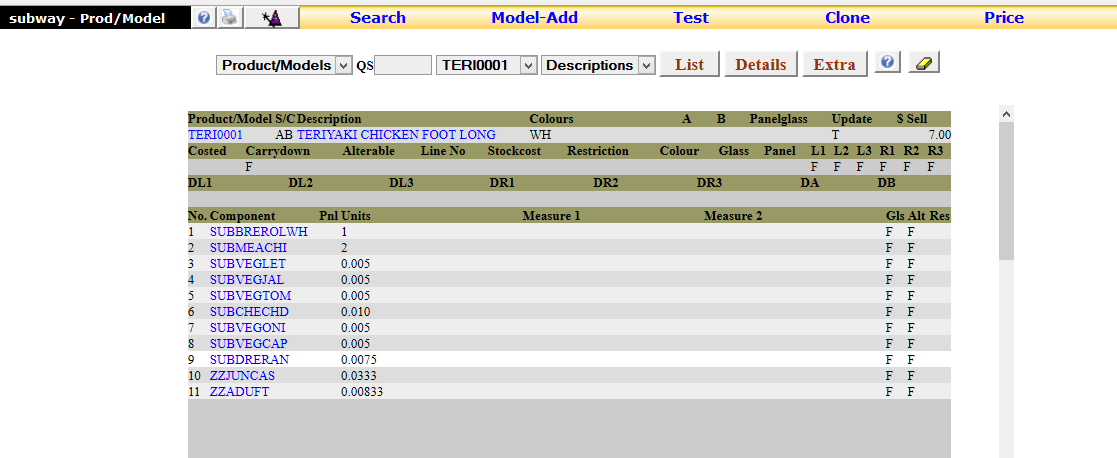
Go to the top menu and select the original model, in this case it is 'TERI'.
Click on the 'Details' button and then 'Model-Add'. You will see an additional box open at the bottom of the screen to enable you to add components.
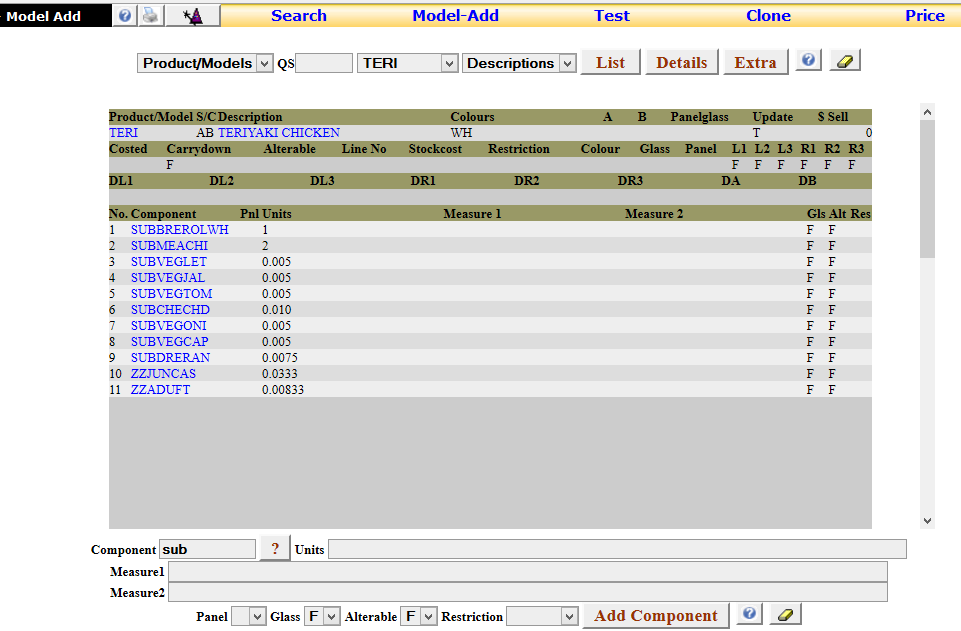
Add a search parameter in the field at the bottom, we have used the word 'sub', and click on the '?' icon to reveal the possible items for inclusion into the model. A popup layer will give you your options.
Click on the blue link to add the item. Enter the quantity, and other measurements if required, and click the 'Add' button at the bottom of the screen.
Once you have added the items you want, open the product from the top menu and click on 'Details'. This will show you the items added to your model.
To see how this product has been costed, click on the 'Test' button at the top of the screen and the layer will change to reveal the 'Product Costing'.
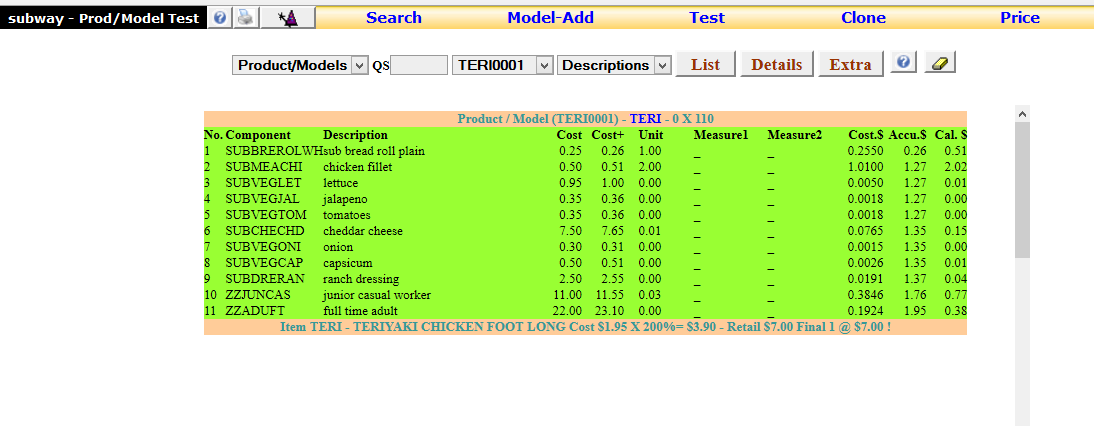
As you can see, the product now shows how much the product costs to produce as well as its selling price.
Add an image by clicking on the blue product name and uploading the image you want to display.
You can now access the product for sale in the POS window.

Enter the details required and click on 'Next to proceed.
On Page 2, you enter the Postal Address and location addresses.
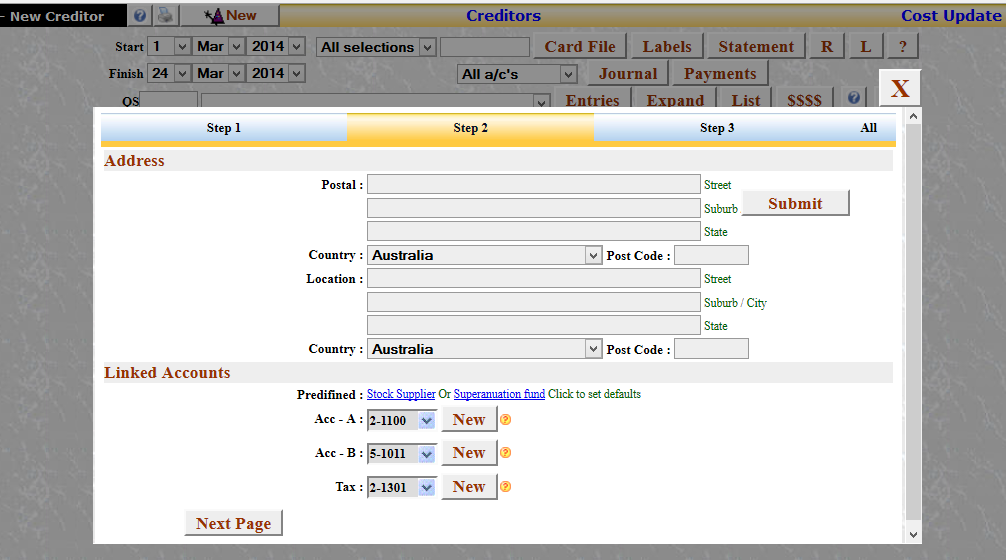
The bottom section, the drop-down marked 'Acc B' allows you to select where the purchases from this supplier are entered. For example, '5-1011 Products at Cost' will allocate purchases to that Account. If you select '6-1021 Printing/Stationary', this will allocate purchases to that Account automatically.
The drop-down box marked 'Acc A' is set to record any purchases to the '2-1100 Trade Creditors' and will usually not be changed.
The box marked as 'Tax' should not be changed as this is the Control Account for recording GST paid.
The next page is where you can setup the 'Trading Terms' and other details that may be required including notes about the company.
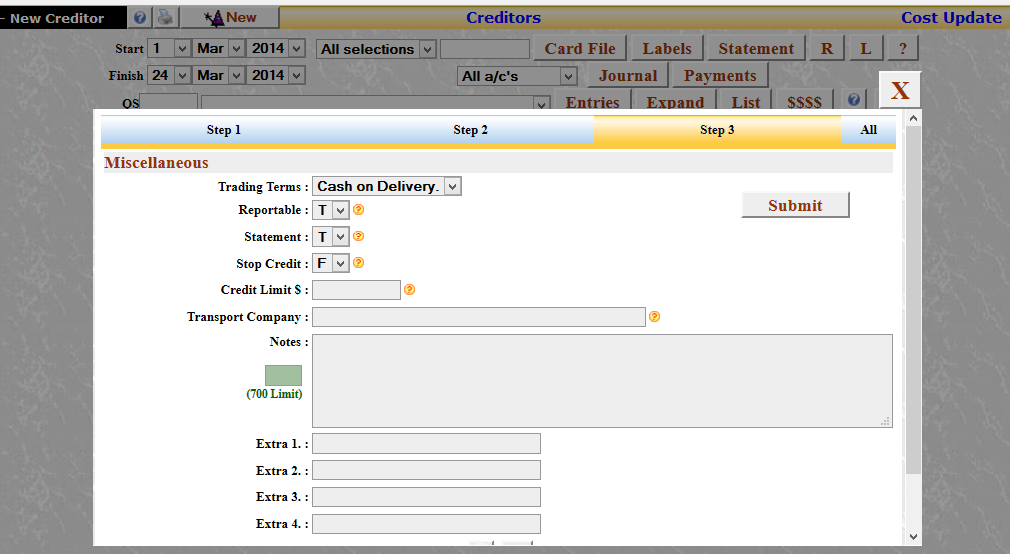
When you have completed entering the Creditors information, click on the 'Submit' button to process the card creation. This can be done anywhere through the process.
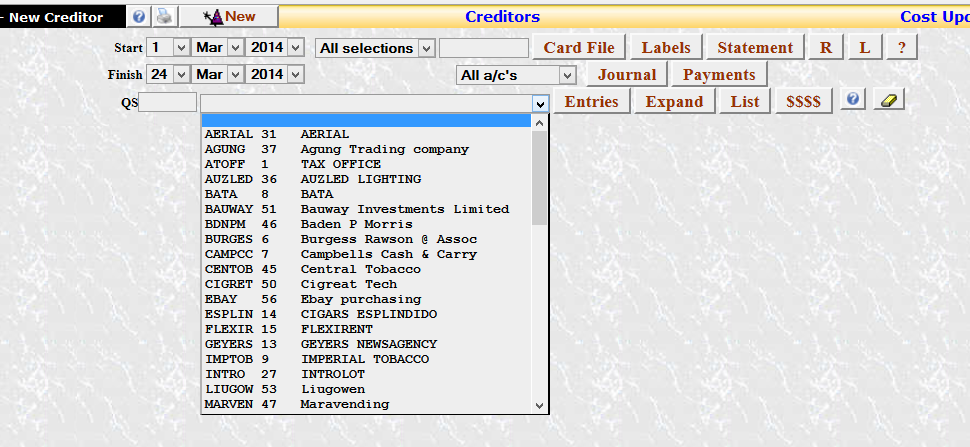
We advise that you then refresh the page by tapping the 'F5' key or clicking the right mouse button and selecting 'Reload' or 'Refresh'.
Then by clicking on the central drop-box, you can check that the card you created has been completed.
Once the Creditor card has been completed it now appears site wide when required. From this screen you can open the suppliers Statement, list Orders, display entries against the supplier, and others.
Try the online bookkeeping demo version and test it out!

Click the image!
Enter 'retailer' as the Account and 'demo1' as the password.
Posted by eziaccounts.com.au


 Blogs
Blogs
